The job of removing and fitting of an oil seal correctly is a very important task no matter where it is being installed, of course in some areas such as rear main oil seal (engine crank shaft) just getting to the seal is the major issue so here are some helpful hints along with some 'do’s' and 'don’ts' to ensure you don’t get another leak.
Basic removal advice:
- Never drive a screw driver between the outer seal case and the housing, damage such as grooves or scratches to the housing could cause oil to seep past or distortion to the new seal being fitted.
- In the same way don’t use a screw driver between the seal and the shaft it’s fitting over, scratches on the shaft would cause early failure of the lip on the new seal.
- There are many tools or YouTube video’s on how to remove a seal but the basics remain the same, never damage any face that the new seal will be either running on or fitting against.
Preparation:
- Check the new seal for any visible damage or defects, remember a seal may have travelled some way to get to you so make sure for example it hasn’t been distorted.
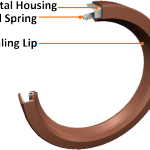
- A standard lip seal will have a ring spring which presses the lip of the seal to the shaft thus maintaining a good seal, prior to installation make sure the spring hasn’t become dislodged.
- Wipe clean any surfaces the new seal will be fitted too, Brake & Clutch Parts Cleaner is a good remover of greases and oils.
- Make sure you have no burrs, scratches, nicks or grooves on any part of the housing or shaft, most failures are as a result of poor running surfaces or housings.
- It is always a good idea to lubricate the running shaft and the lip of the seal, a good tip is to use the same lubricant that the seal will be preventing leaking. Some seals will come pre-packed with a smear of grease, the idea is to help the initial run in of the lip seal and not to build up heat which will cause early failure.
 |
 Incorrect Fitment
 |
 Correct Fitment
 |
 |
Fitting a new seal:
- When installing the new seal always make sure that you have it the correct way around, may sound simple but you never know who’s done what. The spring ring and so the lip of the oil seal should always face the direction that the lubricant is coming from.
- Ensure you fit the seal squarely to the housing or shaft, again a vital part of installation, a 'cocked' seal will cause heat build-up, possible spring dislodge, or even the seal not mating correctly against the face its running on.
- Never tap a seal in with a screw driver or punch on one part of the seal, this will cause distortion to the seals casing and so the running lip of the seal.
- Try to use a tool that contacts the entire outside edge or face of the seal where it is at its strongest, many special tools are available but even something like a socket or tube can do the trick, the ideal is to keep it square and true apply an even pressure and to the correct depth.
- During fitting make sure the lip of the seal always faces inwards and doesn’t get forced backwards, this can usually occur when the seal starts to meet the shaft.
- Make sure that the seal is at the correct depth, if the lip of the seal doesn’t run on the shaft or collar correctly then there is no way the seal can do its job.
- Check for any blocked breathers, these can cause internal pressure on the seal forcing oil out.
- Finally, take your time and make sure you prepare, a seal may seem an easy basic part to fit but get it wrong and it’s a lot more hassle.